View scenes in the scene viewer
In this topic
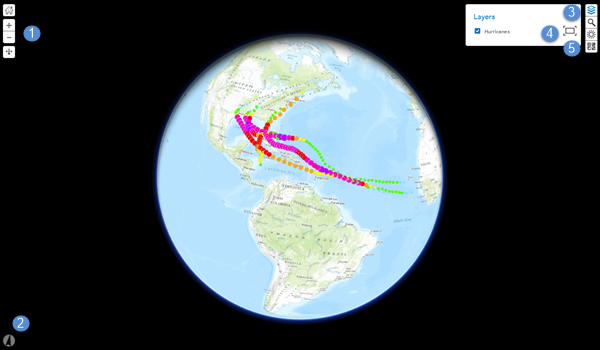
The following is a quick reference for viewing 2D and 3D geospatial content in the scene viewer, an app built into the portal website. The scene viewer works with desktop web browsers that support WebGL, a web technology standard built into most modern browsers for rendering 3D graphics. You can also sign in and use the scene viewer to create scenes.
Note:
Before you open the scene viewer, verify that your browser supports scenes.

1. Navigate
- Click + to zoom in.
- Click - to zoom out.
- You can also use your mouse and scroll wheel to zoom in and zoom out or press and hold the middle mouse button and move down or up to zoom in or out.
- When the Pan button
 is displayed, you can pan. Click and hold the left mouse button and drag the map in the direction you want to move it. You may also pan by using the arrow keys on the keyboard.
 - When the Rotate button
 is displayed, you can rotate. Click and hold the left mouse button and drag the map in the direction you want to rotate it.
 - Either Pan or Rotate is active and is your primary navigation within the scene. If you have a two-button mouse, you can use the left mouse button for the primary navigation and the right mouse button for the secondary navigation. For example, if you activate the Rotate button, you can use the left mouse button to rotate and the right mouse button to pan.
- Click the Home button
 to return to the initial scene state.
2. Stay oriented
Click the Compass button  to reorient your scene North. You may also press N on your keyboard.
3. Search
Type a location into the search box. The Search function will return options matching your location.
4. Zoom to extent
Click the Zoom to button  to zoom your map to the layer's extent within your Viewport.
5. Adjust settings
Click the Environmental Settings button to open a menu enabling you to change how sunlight and shadows affect your scene during different hours and months:
- Drag the Sunlight slider
 left and right to adjust the sunlight affecting your scenes at different times of the day. The box below the slider lists the hour and minute of the sun and changes as you move the slider.
 - To change time zones, choose one from the Greenwich Mean Time (GMT) drop-down list.
- The month box reflects the tilting of the earth as well as its exposure to the sun.
- Check Direct Shadow and Diffuse Shadows to illustrate shadows in your scene. You can change their effect by adjusting the sun slider, time zone, and month.
Note:
Enabling shadows can decrease the performance of the scene viewer. If you notice slow interactivity while navigating, try turning off both shadowing options.