A quick tour of using a service in ArcGIS for Desktop
In this topic
- Connecting to an ArcGIS Server
- Executing geoprocessing tasks
- Working with task results
- Environment settings are ignored
- Copying server task to a custom toolbox
- Exiting an application before a server tool completes execution
- Synchronous and asynchronous tasks
A geoprocessing service contains one or more tasks. A task is really no different than a geoprocessing tool in that it accepts parameters and returns results; it is a term that web-based APIs (such JavaScript, SilverLight, and Flex) use to describe routines that do work on a server and return results. There is no real difference between geoprocessing services and toolboxes or between tasks and tools; it is only for other clients of ArcGIS for Server (such as web browsers and other Internet-based software) that a distinction is made between services and toolboxes, as well as tasks and tools.
Connecting to an ArcGIS Server
Your first step is to connect to ArcGIS Server. From within the Catalog window
- An ArcGIS Server connection can be made from the GIS Servers node.
- You can create a connection in any folder by right-clicking the folder and clicking New > ArcGIS Server Connection.
Finding the URL to a geoprocessing service
When you connect to an ArcGIS Server you need a URL and possibly a user name and password. There are several ways to obtain the URL to a service.
- The ArcGIS Server is hosted by your organization, and the URL is well-known to you.
- You obtained the URL from a colleague.
- You searched arcgis.com for geoprocessing services and found a service containing tasks you'd like to execute. You can obtain the URL to the server hosting the service as follows:
- The description of the service in arcgis.com has an ArcGIS Web API REST Connection entry which contains a URL. This URL is for connecting to the service using REST. To connect to the server in ArcGIS for Desktop, you need a SOAP URL.
- You can derive a SOAP URL from the REST URL. For example, if the REST URL is:
http://sampleserver.esri.com/arcgis/rest/services/SupplyDemandService/gpserver
the corresponding SOAP URL for creating server connections is:
http://sampleserver.esri.com/arcgis/services
(rest, the name of the service, and gpserver are removed from the SOAP URL).
- Use the SOAP URL to create a user connection to the server. Once you have created the connection, browse through the server catalog in the Catalog tree to find geoprocessing services and tasks.
Executing geoprocessing tasks
You execute geoprocessing service tasks just as you do with any other tool—from the tool dialog box, within ModelBuilder, or within a script. The only difference is if you're executing tools in the foreground—some tasks wait for the results to be sent back from the server while others don't wait; they submit the task to the server and occasionally query the server for the result. You use the Results window to observe the status of tasks submitted to the server. The section below, Synchronous and asynchronous tasks, describes this in more detail.
Working with task results
The result of a geoprocessing service is added to the Current Session of the Result window. If the result output data type is a file or raster dataset, the output is saved on a local scratch directory. For other data types such as a feature class, the result is written to the current session displaying the name and/or status of its output datasets. There are five different values for status:
- <empty>
The tool is still executing on the server and no output has been written, or the task was not run successfully and you do not get the result back. This status only applies to asynchronous tools. See Synchronous and asynchronous tasks below for more information.
- <data in local temp location>
The tool has finished executing and the output data resides in either your computer's memory or your system temp directory. The data will not be deleted as long as you have an ArcMap layer that references the data. If you want to preserve the data, you should copy it from this temporary location to a known location. An easy way to do this is to use the Copy tool, dragging the dataset from the result into the input features parameter of the tool. You can also right-click the output and click Copy Location, which will copy the path of the feature class to the clipboard, allowing you to paste it anywhere that accepts text, such as the input features parameter to the Copy tool.
- <data on server>
The data resides on the server. It also means that there is a result map service that will draw the data in ArcMap, ArcGlobe, or ArcScene. This result map is automatically added to the table of contents when the tool finishes executing on the server. If you need to add this result map service to the table of contents, right-click the result tool and click Add Server Layer.
You can also right-click the result tool and click Get Data, which will copy the data from the server to your computer. After copying, the status will either be <data in local temp location>, <data exceeds transfer limit>, or <data unavailable>.
- <data exceeds transfer limit>
The Get Data action was not able to transfer all the data from the server to your computer because the maximum number of features to transfer was exceeded. Copying large datasets degrades the server's ability to execute other GIS services and clogs the network. Therefore, the service author specifies a maximum number of features that can be copied from the server to a client computer. If you need to copy data that exceeds the limit, you need to contact the service author or server administrator and arrange for other ways to get the data.
- <data unavailable>
The Get Data action could not find the data on the server. The most likely cause is that the server administrator determined that the task results were obsolete and deleted the data to free up space on the server.
Environment settings are ignored
Geoprocessing services explicitly set any environment settings on the server that affect execution. Your local environment settings in ArcGIS for Desktop that you set within your current session have no effect on the environment settings used by services.
Copying server task to a custom toolbox
You cannot copy a task from a geoprocessing service into a custom toolbox (one that you create).
Legacy:
Prior to version 10.1, you could copy a task to a custom toolbox. This capability has been removed at version 10.1.
Exiting an application before a server tool completes execution
Once you've submitted an asynchronous tool (see below), you can exit the application you are working in. For example, if you're working in ArcMap, you can start execution, save the map document, and exit ArcMap. When you open the document later, ArcMap will query the server, check the result status, and update the result in the Results window. If you are going to use this method of starting execution and exiting ArcMap (or ArcGlobe or ArcScene), be sure to save the map document to save the result for later inspection.
Synchronous and asynchronous tasks
Geoprocessing services and their tasks are either synchronous or asynchronous. Synchronous means that your computer will wait while the task executes on the server. Asynchronous means that your computer doesn't have to wait for the tool to finish execution and you can move on to other tasks.
It is up to the publisher of the service to decide whether a task executes synchronously or asynchronously. Only tasks that execute quickly and have small output datasets should be published as synchronous tools.
There are two ways to determine if a server tool is synchronous or asynchronous:
- If you have administrative privileges to ArcGIS for Server, you can browse to the server in the Catalog window, right-click the geoprocessing service, then click Service Properties. The execution type of the tool is listed on the Parameters tab.
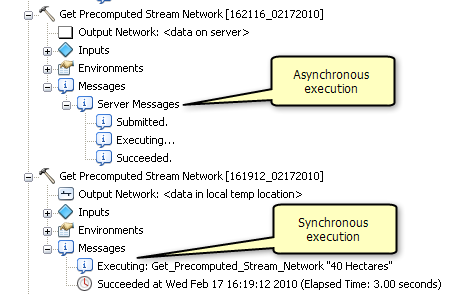
- Execute the tool and observe the messages it writes. When an asynchronous service is executed, the first message written will be Server Messages. These types of geoprocessing services will always run as a background process in ArcMap. A synchronous tool will start by displaying Executing. The two results below have been executed asynchronously and synchronously (as set by the GIS server administrator).
When you execute an asynchronous tool within ArcMap and have enabled the adding of tool results to the display, a layer will be added to the display but will not be visible (checked on). This is because ArcMap doesn't know when the tool will finish executing and have output to draw.
You are not automatically informed when an asynchronous tool finishes execution. You track the progress of an asynchronous tool in the Results window. When the tool is executing, an hourglass will be displayed next to the result. You can cancel execution by right-clicking the result and clicking Cancel. When the task is done, you will see the message stating Succeeded and a tool icon is displayed next to the task name of the result.